API 概览
在深入了解之前,让我们快速浏览一下 Socket.IO 提供的 API:
通用 API
以下方法可用于客户端和服务器。
基本的 emit
如我们在步骤 #4中所见,可以使用 socket.emit() 向另一端发送任何数据:
- 从客户端到服务器
- 从服务器到客户端
客户端
socket.emit('hello', 'world');
服务器
io.on('connection', (socket) => {
  socket.on('hello', (arg) => {
    console.log(arg); // 'world'
  });
});
服务器
io.on('connection', (socket) => {
  socket.emit('hello', 'world');
});
客户端
socket.on('hello', (arg) => {
  console.log(arg); // 'world'
});
你可以发送任意数量的参数,并且支持所有可序列化的数据结构,包括二进制对象,如 ArrayBuffer、TypedArray 或 Buffer(仅限 Node.js):
- 从客户端到服务器
- 从服务器到客户端
客户端
socket.emit('hello', 1, '2', { 3: '4', 5: Uint8Array.from([6]) });
服务器
io.on('connection', (socket) => {
  socket.on('hello', (arg1, arg2, arg3) => {
    console.log(arg1); // 1
    console.log(arg2); // '2'
    console.log(arg3); // { 3: '4', 5: <Buffer 06> }
  });
});
服务器
io.on('connection', (socket) => {
  socket.emit('hello', 1, '2', { 3: '4', 5: Buffer.from([6]) });
});
客户端
socket.on('hello', (arg1, arg2, arg3) => {
  console.log(arg1); // 1
  console.log(arg2); // '2'
  console.log(arg3); // { 3: '4', 5: ArrayBuffer (1) [ 6 ] }
});
提示
不需要对对象调用 JSON.stringify():
// 错误示例
socket.emit('hello', JSON.stringify({ name: 'John' }));

// 正确示例
socket.emit('hello', { name: 'John' });
确认机制
事件非常有用,但在某些情况下,你可能需要更经典的请求-响应 API。在 Socket.IO 中,这个功能被称为“确认机制”。
它有两种形式:
使用回调函数
你可以在 emit() 的最后一个参数中添加一个回调函数,当另一端确认事件后,该回调将被调用:
- 从客户端到服务器
- 从服务器到客户端
客户端
socket.timeout(5000).emit('request', { foo: 'bar' }, 'baz', (err, response) => {
  if (err) {
    // 服务器未在给定时间内确认事件
  } else {
    console.log(response.status); // 'ok'
  }
});
服务器
io.on('connection', (socket) => {
  socket.on('request', (arg1, arg2, callback) => {
    console.log(arg1); // { foo: 'bar' }
    console.log(arg2); // 'baz'
    callback({
      status: 'ok'
    });
  });
});
服务器
io.on('connection', (socket) => {
  socket.timeout(5000).emit('request', { foo: 'bar' }, 'baz', (err, response) => {
    if (err) {
      // 客户端未在给定时间内确认事件
    } else {
      console.log(response.status); // 'ok'
    }
  });
});
客户端
socket.on('request', (arg1, arg2, callback) => {
  console.log(arg1); // { foo: 'bar' }
  console.log(arg2); // 'baz'
  callback({
    status: 'ok'
  });
});
使用 Promise
emitWithAck() 方法提供相同的功能,但返回一个 Promise,一旦另一端确认事件,该 Promise 将被解析:
- 从客户端到服务器
- 从服务器到客户端
客户端
try {
  const response = await socket.timeout(5000).emitWithAck('request', { foo: 'bar' }, 'baz');
  console.log(response.status); // 'ok'
} catch (e) {
  // 服务器未在给定时间内确认事件
}
服务器
io.on('connection', (socket) => {
  socket.on('request', (arg1, arg2, callback) => {
    console.log(arg1); // { foo: 'bar' }
    console.log(arg2); // 'baz'
    callback({
      status: 'ok'
    });
  });
});
服务器
io.on('connection', async (socket) => {
  try {
    const response = await socket.timeout(5000).emitWithAck('request', { foo: 'bar' }, 'baz');
    console.log(response.status); // 'ok'
  } catch (e) {
    // 客户端未在给定时间内确认事件
  }
});
客户端
socket.on('request', (arg1, arg2, callback) => {
  console.log(arg1); // { foo: 'bar' }
  console.log(arg2); // 'baz'
  callback({
    status: 'ok'
  });
});
全局监听器
全局监听器是一个会在任何传入事件时被调用的监听器。这对于调试应用程序非常有用:
发送者
socket.emit('hello', 1, '2', { 3: '4', 5: Uint8Array.from([6]) });
接收者
socket.onAny((eventName, ...args) => {
  console.log(eventName); // 'hello'
  console.log(args); // [ 1, '2', { 3: '4', 5: ArrayBuffer (1) [ 6 ] } ]
});
类似地,对于传出数据包:
socket.onAnyOutgoing((eventName, ...args) => {
  console.log(eventName); // 'hello'
  console.log(args); // [ 1, '2', { 3: '4', 5: ArrayBuffer (1) [ 6 ] } ]
});
服务器 API
广播
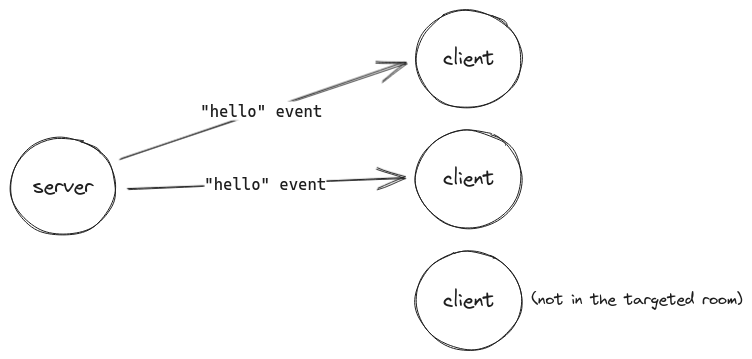
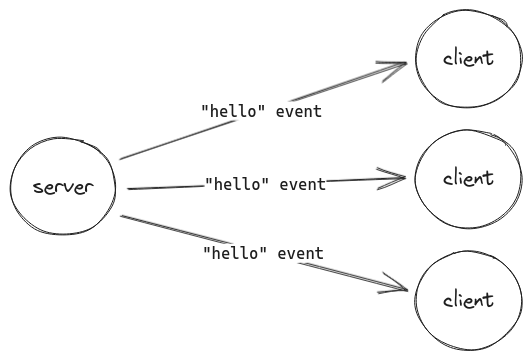
如我们在步骤 #5中所见,可以使用 io.emit() 向所有连接的客户端广播事件:
io.emit('hello', 'world');

房间
在 Socket.IO 术语中,房间 是一个可以让 socket 加入和离开的任意通道。它可以用于向一部分连接的客户端广播事件:
io.on('connection', (socket) => {
  // 加入名为 'some room' 的房间
  socket.join('some room');

  // 向房间内所有连接的客户端广播
  io.to('some room').emit('hello', 'world');

  // 向除房间内的客户端外的所有连接客户端广播
  io.except('some room').emit('hello', 'world');

  // 离开房间
  socket.leave('some room');
});